In the last tutorial we made a basic flood shader. Today we'll make a basic 3D lighting shader.
Lighting shader usually use normals. As you may remember from the last tutorial, normals are the vectors which are perpendicular to each triangle. I will explain them in better detail.
Lighting shader usually use normals. As you may remember from the last tutorial, normals are the vectors which are perpendicular to each triangle. I will explain them in better detail.
Normals
Normal vector information can be received using the "in_Normal" attribute. This is only processed for each vertex (because it's in the vertex shader). So we'll create a varying vector called "v_vNormal" and we'll add it to both shaders (fragment and vertex). This way the normal can processed per pixel rather than per vertex. To test this shader we'll set the color to the normals so we can see what the normals look like. This is the code I used:
gl_FragColor = vec4(v_vNormal*0.5+0.5,1.0);
Because normals are in the range of -1 and 1 we'll multiply it be 0.5 and add 0.5 to put it in the range of 0 to 1 (since we can't see negative colors).
Here is what it looks like (downloads at the bottom):
gl_FragColor = vec4(v_vNormal*0.5+0.5,1.0);
Because normals are in the range of -1 and 1 we'll multiply it be 0.5 and add 0.5 to put it in the range of 0 to 1 (since we can't see negative colors).
Here is what it looks like (downloads at the bottom):
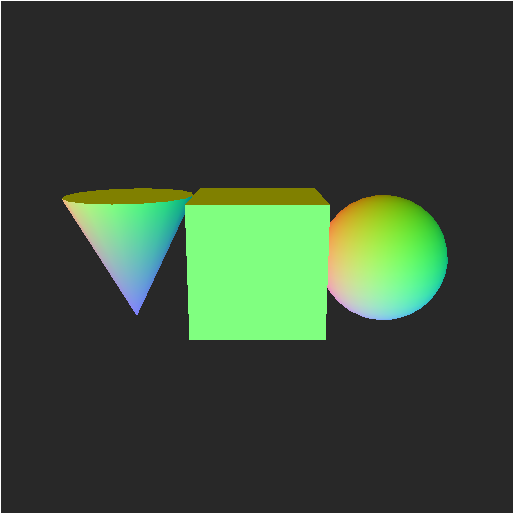
That is a simple scene with a sphere, cube and cone. You can see the normals with our shader. When you make your own models, you'll want to make sure the normals are correct.
Now we'll move on to a simple lighting shader.
Now we'll move on to a simple lighting shader.
Simple lighting
Now that we get normals we'll make some simple directional lighting. To do this we will need to create a few vectors. We'll create a vec3 called "dir" and set it to something like "vec3( 0.6, 0.1, -1.0)".
This will be the direction of our light. Next create another vec3 called "col". This will be for the light color. We'll set this to a nice blue color (I used "vec3( 0.5, 0.8, 1.0)").
Now create a float called "lighting". Since this will be for the brightness of the pixel we'll need to calculate how much light it is receiving. We'll use the dot product function. This function finds the difference between two vectors in the range of -1 to 1 (if used properly). The vectors should be normalized. When you normalize a vector it sets the length of the vector to 1 while keeping it in proportion. If you do not do this to the vectors of a dot product, then it will return something in a range larger (or smaller) than -1 to 1 and in this case, ruin the lighting.
So now we'll set lighting to the dot product of "v_vNormal" and "dir" (make sure their both normalized). This will find the difference of the normal and the light (between -1 and 1).
To convert this to a visible value we multiply it by 0.5 and add 0.5. Now mulitply the "lighting" float and "col" vector to the texture color (making sure it is a vec4). Your code should look like this:
vec3 dir = vec3( 0.6, 0.1, -1.0);//Light direction
vec3 col = vec3( 0.5, 0.8, 1.0);//Light color
float lighting = (dot( normalize(v_vNormal), normalize(dir)) * 0.5 + 0.5);//Calculate
gl_FragColor = v_vColour * texture2D( gm_BaseTexture, v_vTexcoord) * vec4( lighting * col, 1.0);
This gets the desired light direction and color, then calculates it with "lighting" and finally applies it to the texture. This is the result (downloads below):

As you can see, our nice scene now has lighting. Lets take this farther by creating a point light.
Point lights
Now that you have a basic understanding of 3D lighting we can create point lights.
We want the point lights to have a radius. So we can add a float called "rad".
Since these lights cast shine in all directions, we'll need to change the "dir" vector.
This is actually simple to set, but we'll need the position of each pixel, so we'll add another varying vec3 and call it "v_vPosition". In the vertex shader, set it to "in_Position".
With the position we can calculate the direction from the light to each pixel. We simple put in the desired position for the point light (I used "vec3( 0.0, 32.0, -96.0)") and then subtract the pixel position ("v_vPoisiton"). That gets the direction for the light.
Now the last thing we'll add is a radius. This will make the light fade the farther the it is from the surface of each object. This is called Attenuation so we'll make a variable called "attenuation". Set this variable to the length of "dir" (so we get the distance from the light) and divide it by "rad" (so the brightness equals one when it is at the radius distance and 0 when at the light). This is opposite of what we want so we'll have it 1 minus are current code. To keep this from going negative we'll put the max function around our code with the second argument to 0 (which keeps it from going below 0).
The fragment code should look like this:
vec3 dir = vec3( 0.0, 32.0, -96.0) - v_vPosition;//Light direction
float rad = 128.0;//Light radius
vec3 col = vec3( 0.5, 0.8, 1.0);//Light color
float attenuation = max( 1.0 - length(dir)/rad, 0.0);//Calculate brightness
float lighting = (dot( normalize(v_vNormal), normalize(dir)) * 0.5 + 0.5) * attenuation;//Calculate lighting
gl_FragColor = v_vColour * texture2D( gm_BaseTexture, v_vTexcoord) * vec4( lighting * col, 1.0);
When running the code, the result should look like this (downloads at the bottom):
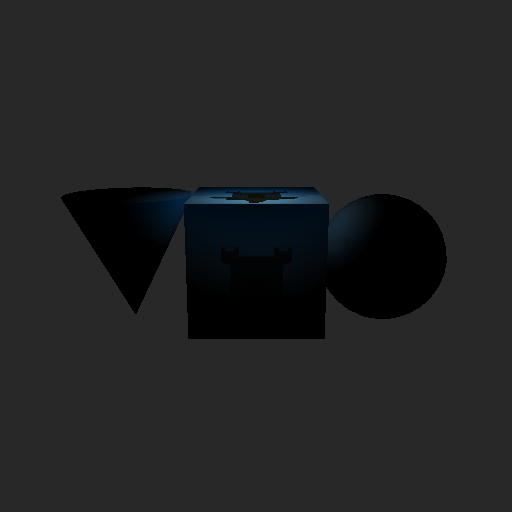
There's a simple light in the center of the screen which properly fades. You can easily add a uniform for changing light position, radius, direction, or color if you want, but that is up to the developer.
DOWNLOAD NORMALS EXAMPLE
DOWNLOAD DIRECTIONAL LIGHT EXAMPLE
DOWNLOAD POINT LIGHT EXAMPLE
DOWNLOAD NORMALS EXAMPLE
DOWNLOAD DIRECTIONAL LIGHT EXAMPLE
DOWNLOAD POINT LIGHT EXAMPLE
 RSS Feed
